
When I needed a screenshot in the past, I would have to use print screen, and then go into paint to paste it and then crop it.
With Windows 10, Microsoft has made it a lot easier to grab any parts of your screen for later use with the Snipping Tool, which comes pre-installed in Windows 10.
In case you prefer a video – play on, if not scroll down and read on!
Once you have launched Snipping Tool, you will have 4 different options to choose from free-form snip, rectangular snip, window snip and full-screen snip.
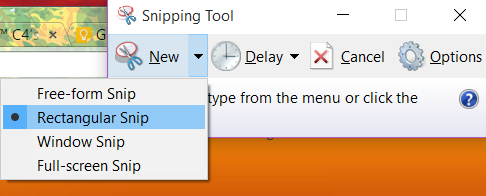
Free form snip is pretty much like using a S-Pen for you Galaxy Note users out there. After selecting this option, you can then draw around the shape you would like and that image will be saved. However, it will still be saved as a rectangle.
The other format are self-explanatory, the rectangle snip basically enables you to drag you mouse with the application forming a perfect rectangle for you to grab the part of the screen that you desire.
Windows snip is suppose to just grab the active window you are highlighting over, but as you can see in the video – it doesn’t work as well as advertised. Finally, the full-screen snip, is just that – a full screen screenshot.
After you have snipped away, you have further options on editing your new snip, further cropping, writing on top of the image and of course, saving the image.
What do you think? Have you tried the snipping tool? Tweet us @AsianGeekSquad!
Max Law
Latest posts by Max Law (see all)
- I bought a used iPhone 14 Pro Max for $699.99! - July 28, 2023
- All about the HP Sprocket Studio+! - July 25, 2023
- Get the Samsung Galaxy S22 Ultra – TMobile for just $500! - July 15, 2023
- Get $50 off the Pixel 7a AND get $50 Google Store credit! - July 11, 2023
- All of our Mobvoi TicWatch Pro 5 videos and FAQs! - June 6, 2023